Pages

Thursday, November 3, 2011

Bee block time

Red and Aqua bee test block
I've decided to join in a quilting bee - this is my first ever bee and so far it sounds like a lot of fun. As it turns out, November is actually my month - trial by fire I guess.

So here is the block I've chosen for my partners this month
Red and Aqua bee test block

This is the stargazing block designed by Angela Pingel (cut to pieces) from the book Modern Blocks.

I've done my block up in a palette of Aqua and Red on a natural linen background! Hey it's the Aqua and Red bee after all.

So far I'm liking this palette a lot. You might notice a little holiday inspiration in there. I figured it was a good way to get myself and hopefully everyone else, in the holiday mood.

I can't wait to see what my partners come up with.

Happy Sewing!

Tuesday, November 1, 2011

Hello November??

Oregon born, ??? bound
Really? November already? Where has the time gone? I have not been blogging much due to the fact that I have not been sewing much. October has come and gone and aside from some Halloween costumes, I've barely gotten any sewing done. Hence the blog hiatus.
Oregon born, ??? bound

So you probably don't know that the Pillow talk Swap was on again, and today was actually our mailing deadline. This pillow has been a month or more in progress but it’s finally done and off to it’s new home. I hope you like it partner! It's kind of anthro-inspired. I had fun making it and I even got to try some creative paper piecing, a little hand embroidery (ok haven't done that in years)
Oregon born, ??? bound

EDITED 12/7
By now my partner John, QuiltDad has received his pillow and he likes foxes which is why I chose that theme. I used Sonja's (Artisania) paper pieced fox pattern to make the fox on the back of the pillow. You can find her patterns here.

Tuesday, September 13, 2011

Back to work tote

Library tote

I did mention I was taking a blog break didn't I? Back in August. Well Summer has come and gone but i'm still in vacation mode apparently.  I am not ready for the kids to be back to school, not ready for summer to be over, not ready for the warm weather to leave, not ready, not ready…..  Isn’t that always the way? Seems like every year goes by faster and faster. 
Library tote


But it is time to go back to work and time to get this blog back up and running.  The first stop on this crazy train will be the “For the love of Solids Swap” item.  I’ve finally, (practically down to the wire this time) gotten my project done for my partner.
Library tote
It’s a tote bag, ok you could probably tell that by looking.  I have had this circle piecing idea in my head for at least the last 5 years and finally there was a project to try it on.  The circle piecing I used exposes the raw edge on the outside of the fabric, creating a textural fabric.  The circles are pieced as squares leaving a circular seam allowance and lending this circular feel to the final fabric.  That’s what I was going for.  I hope my partner is ok with this look, because it’s a bit ‘un-orthodox’ shall we say?  The colors conform to my partners preferences.  I think the final project turned out  as I planned it.  The main body of the bag is Kona Charcoal offset with various selections from the Kona fat quarter bundle in grape. Lining is Michael Miller. Off to make a little extra and then it will be shipping its way across the pond??  Continent?  Region??......

Library tote

Happy Sewing!

Tuesday, August 2, 2011

For the love of solids Swap

With the Pretty {little} pouch Swap project done, I've cleared the way for the next swap - For the love of solids. 

My inspiration mosaic

Solid Simplicity


My palette for the partner assigned to me - which I quite like myself as it turns out...
For the love of solids swap


I think I've got the design plan all wrapped up but you'll have to wait and see what comes of it in a few weeks. Meanwhile, I'm taking a blogging break for a few weeks.  See you at the end of August.

Happy Sewing!

Sunday, July 31, 2011

Along the road to a new design

Introducing the Audrey pouch. A new design ~

This starts as an idea and gets (chicken-scratched) sketched.


Then it goes to a full-sized pattern trial.


It gets cut out and stitched and the final piece is subjected to my scrutiny to be sure that it looks like I intended it to look. If not, adjustments are made to the pattern and it goes back to the sewing stage.

This one miraculously managed to work out the first time.
New Design: Hepburn Pouch
That rarely happens.

Then it goes to the make up a bunch more stage.
Hepburn

One for my kiddo
Hepburn for tweens
and one for my Swap partner for the Pretty {little} pouch swap on Flickr.
Audrey pouch for?....

And finally, it goes to the pattern which you can download hereA big Thank-you goes out to Yeechi who digitized the pattern for me. Thanks Yeechi!


I hope you like it.  If you do make this pouch, please share your pics in the Trilliumdesign ~share it Flickr Pool.  Let me know what you think! I would love your feedback.

Happy Sewing!

Tuesday, July 26, 2011

Fun with purse frames

On my previous post, I showed you my first pouch made with a purse frame.  Let's just say that working with these frames takes some getting used to.  Seems like they are all the rage in the sewing world right now. They are fun and they are addictive - so fair warning! Ok now that the legalities are out of the way, let's get started.

A Zig and a Zag clutch

I wanted to show you the test pouch I made in getting ready for the Pretty little Pouch swap on Flickr.  Purse frame clutches/pouches/bags are super easy to make - you just make the bottom half of the bag essentially, the top half gets inserted into the frame and glued, so you don't have to be super careful about what the top looks like since you won't see it anyway. And that's where it might be prudent to think about the insertion into the frame. The tutorials I've seen all say to poke the top of the bag into the frame with a pair of scissors/screwdriver/whatever kind of pointy object you have around. This is all well and good if you are just making a plain old single fabric bag. But if you are a tweaker like me, and have to go all fancy and patchworky, it's trickier than it sounds. You don't want the top of that bag to be thicker than the frame will accommodate. For example for this patchworked pouch, there are lots of seams around the patchwork, plus there is fusible fleece interfacing and heavy duty interfacing on the lining plus the fabric of the seams themselves. This mess was all too heavy to go into the frame easily even with a pointy object assisting.  Plus you are working against the clock, putting the glue on the edge of the bag and inside the frame, it's not the easiest thing to poke all that in there without making a huge mess (course,  it doesn't help if you tube of glue is leaking out the wrong end). Ok, so having said that the first time I tried inserting this it was a royal mess - the seams and all that interfacing where just too thick and it was tough to insert. After gluing only one side and barely getting the fabrics in there, it looked like crap!  I let the glue cure and then decided to rip it all out again. I then undid the seams, trimmed off all the excess interfacing and the bulkiest seams from the patchwork and trimmed the whole shebang down. This time I just basted the tip of the bag shut and then glued that right in. This considerably reduced the thickness of the bag at the top and made insertion much easier. So that's just a tip if you are making a fancy patchwork bag that you want to insert into a frame. A plain old regular bag made of solid fabrics was easy peasy. Just so you know.
A Zig and a Zag clutch

I got my frames from various places off etsy, including whilebabynaps (who has lightening fast shipping by the way) 3Dpatternpaper and AmericanPurse.   All orders were fine for me.

The bag itself is made of tiny half square triangles assembled into a chevron shape. The squares were 1.5" when I started and are about 3/4" finished - so they are tiny but they were fun to make. I then added on the extra linen and used my bag pattern to cut out the shape of the bag. I added some handstitching, some fun lining and then proceeded to assemble the bag. The basics of my procedure are outlined here on the U-handbag site. I just changed up the bottom shape of the bag to suit my purposes. I wanted something small enough to serve as a sunglass case.

So now that that's accomplished, off to make a few dozen more. These are fun, I won't lie to you they are super addictive and quick to make. Why not get a head start on Christmas prezzies. ;)

Happy Sewing!

Wednesday, July 13, 2011

Summer Swap Season

It seems like summer is a busy time for swaps for me which is kind of funny because I have way less time to sew in the summer. But this time I opted into the Pretty {little} Pouch swap just for fun.  I like making purses and pouches so I thought I would give it a go. 

Here’s  my inspiration mosaic – really anything goes with a pouch ~  I mean it’s just a pouch!  You can always find a use for one and it’s pretty hard to go wrong.
Pretty {Little} Pouch Swap Inspiration ~ Round 2

Test run 1 with a purse frame. 
Fun with purse frames

Turns out this isn't the right kind of pouch for this frame - but live and learn - that's why it's a test run. Framed purses are fun to do though and super quick!
Fun with purse frames
So far so good, now onto test 2. 
Here is a little trial run pouch I’m making for myself to see if this works out.
mini zigs and zags
Then I’ll move onto this palette for my partner and the rest will have to wait until the grand reveal.
Pouchy palette


Happy Sewing!

Thursday, July 7, 2011

Scootin' around town tote

Scootin' about town tote
I had to sew up another bag - I just love these multi-tasker totes and I thought it would be nice to have a new one for our summer vacation travels.

Here's my Echino version:
Scootin' about town tote

I modified this one w/ magnetic snap closures for more travel security and added a zip pocket.


Happy Sewing!

Wednesday, July 6, 2011

PTS5 Swap pillow has arrived

...So it's the end of a long but routine work day.
I'm tired.
I trudge down to the mailbox to retrieve the days deliveries.
Oh there is a key to the larger box for parcels and this immediately lifts my spirits. Parcels are like Christmas around here.
I open the large box where the parcels are kept.
I glance at the label.
Royal Mail.
Again!
Who doesn't love getting 'royal' mail? That must be extra special mail.
I feel all Queenly.
I contemplate waving to my subjects.
I remember they are all inside playing video games.
I think, "what's this?" Oh it must be my swap pillow!
I immediately shred into the package right there in the street in front of my house.
Eeek!
It IS a pillow. And a lovely pillow to!

Don't you agree?
PTS5 Swap pillow from Fionapoppy


Yes this lovely pillow plays very well with it's fellow couch mates.
All my couch pillows

And look a mug rug to boot!!!
Mug Rug from Fionapoppy

My desk at work needs one of these, so this is extra special.

Thank-you Fiona!! These are perfect for our home and will be enjoyed for years to come!

Monday, June 27, 2011

Tumbling blocks with aqua and linen


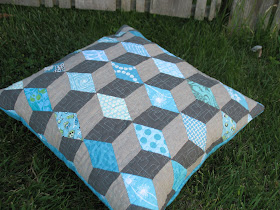
Yet another tumbling blocks pillow, but this one will live in my house.
After the last pillow talk swap, the boys in the house were really loving the tumbling blocks design - they like everything that looks 3-D, so I decided to make another one.

This time I chose natural linen and aqua colors because they fit in well with the living room sofa and coordinate with the other existing pillows. I also used a gray linen and lots of different prints of aqua fabric.

I used 2" 60 degree triangles this time, so my blocks are a bit bigger. I also got to try out my new free motion quilting design which I've been practicing for the ORBC FMQ QAL ~ translation: Old Red Barn Company Free-motion Quilting Quilt-along led by Debbie Brown. ha! That's a mouthful! Here's a close-up...


And on a completely different note: I made key lime cupcakes using a recipe recommended by Emily of Crazy Old Lady quilts - I made cupcakes instead of a cake because we are on a cupcake kick at our house. OMG! So Yummy!! I modified the recipe by adding some lime zest to both the batter and the frosting oh and I used regular white cake mix because my store didn't carry lemon. Delish!! Try it out!
Happy Sewing and Baking!

Friday, June 24, 2011

Summertime!


Summer! It's officially here! And it calls for a new beach tote, don't you think?Well, yeah! And all things beachy and water-related and well, you know, summery!

I really love large-scale prints, and I thought this new Loulouthi print from Anna Maria Horner would be perfect for summer.

I used the laminate version for the outside of the bag to help keep it from getting soiled/wet. I don't think I've sewn a bag with laminate before and I will say it was a bit of a challenge but more on that later. I used the multi-tasker tote pattern for this bag which I have made many times and it's the perfect all purpose tote-about and a great size for just about everything. Plus it whips up super fast, what's not to love?


So I guess if you are going to sew laminate you really need to get one of those teflon coated feet or roller foot to help the foot glide over the plastic. I don't have one of those feet, so I made do by placing a sheet of paper over the seam and sewing on that to help it glide which worked pretty well. The paper rips off easily afterwards, but I really should've used something more like tissue rather than standard computer paper. Some of my top stitching is a bit wonky where the paper pulled the stitches a bit - so I'm not going to show you any close-ups. It's a pool bag so I'm gonna roll with it - drink another margarita and forget all about my wonky stitching. It's summertime right? ~ no stress allowed!


Happy Sewing!

Thursday, June 23, 2011

PTS 5


It's that time again in Flickr-land, time for the ever popular Pillow Talk Swap, round 5.
PTS 5 sneak peek
This is a quickie round without the full compliment of usual cohorts, but quite fun nevertheless. Partners were given out a few weeks ago and I've just finished up my pillow for this round. I hope my partner likes it! My partner is a bit more of a traditional quilter from what I can tell, so I hope that this choice reflects their tastes. I chose to go with english paper-piecing of 60 degree diamonds into these tumbling block shapes. PTS5 peek
The Y chromosomes in my house both liked it but then again, they are always eyeballing things with Escher-esque overtones, so that was no surprise.

Lots of bright colors which my partner seems to prefer and paired with starkly contrasting black and white. I used some of Carolyn Gavin's Spring street line as the border/back and added some gathers to give it more texture.
Off to other parts of the union she goes....where will she surface next?...


Happy Sewing!


Wednesday, June 22, 2011

Free-motion QAL

Are you interested in learning more about free-motion quilting? Well, I certainly need some more practice in this area, so I joined the Stop, drop and roll QAL hosted by Old Red Barn Co and Debbie Brown quilts. Won't you join us?

My progress so far...

I put together this quilt top,
ORB QAL ~ Verna and company
but so far we are just practicing with scrap sandwiches..
FMQ Practice


FMQ Practice
What the final quilt will be is a mystery even to me!

Stay tuned and Happy Sewing!

Friday, June 17, 2011

Birthday Celebration ~ Sale on Fabric!

June is my Birthday Month at Trillium Design. So in celebration, I am offering 20% off in the shoppe for the remainder of the month. Enter the code BIRTHDAY20 in the coupon box when you checkout and you will get 20% off your total purchase price. Lots of great and hard to find goodies in the shop, so please check it out. I'm closing the shop after the sale for the remainder of the summer, so get your fabric while you can. Let's go fabric shopping! Just click on the shoppe logo:

Trilliumshoppe at Etsy

And afterwards, let's go eat some cake! Happy Sewing!