Thursday, December 30, 2010

10

Another year comes to a close. Bye Bye 2010.....hello 2011.

The year in Quilty Review:
Quilts of 2010

10! I made ten quilts this year. Hey, that's not too shabby!! I'm pretty proud of myself. Who knew this quilting thing was going to stick around that long? I guess I can't count myself as a newbie quilter anymore?

2010 was also productive in other ways ~ there was plenty of swap sewing, and gift sewing, some new home decor things and other fun stuff I sewed just because ...

2010 some sewing highlights

And a few much needed clothing items...
Apparel 2010

All in all, 2010 was a great year for our family!! Thanks to all my blog readers for providing feedback and well wishes and for just being there! Without you there would be no point to this blog!

Here's to a fruitful and fun 2011. Happy New Year everyone! Hope all your fiber dreams come true.

Friday, December 24, 2010

Christmassy blogging ~ part deux!

Farmland


It's Christmas! Happy Holidays to all my friends in blogland!
Pig pen

A little holiday cheer from our household. This is what happens when you leave Dad in charge of the gingerbread house making ~ You get some serious construction and I wouldn't be surprised if power tools were involved somehow! The kids had fun designing and building their Christmas farmland!

Farmland


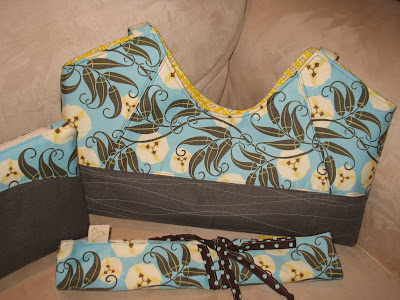
Meanwhile, now that Christmas is here, I can write about my other Christmas gift sewing adventures. Here's a little homemade goodness for my mom who is also a knitter....

This bag follows the same design I used for the Holly’s bag for the Urban Home goods Swap. I added in a notions case and a needle roll for straights and double-pointed needles. Fabrics are some Amy Butler Nigella from my stash paired with some lovely Italian Linen (also from the stash). Linings are Bijoux from Heather Bailey and ta dots from Michael Miller.

Then a case just for circular needles.

Circular needle case

This one is mostly made of Echino fabric which I have been dying to use.

Echino circular needle case based on a tutorial over at Wonderland and the Bone Rome


Happy Holidays and Happy Sewing!

A-frame farmhouse

Wednesday, December 22, 2010

Christmassy blogging


It is so difficult to blog about what you are sewing, when they are Christmas gifts! Especially when the recipients read my blog! I think I need to institute a blog ban for them and hope they don't peek!! Some people are sneaky about their Christmas gifts, you know? he he

Well, here is the first set of gifties. Little mug rugs for my lovely work-mates.
I had fun making these because I got to try all sorts of blocks without the commitment of having to turn them into a full-fledged quilt!

I really enjoyed paper-piecing the geese in a half circle ~ and I learned a valuable lesson ~ I will never make an entire paper pieced quilt! Waaaaay too much work and not enough instant gratification for moi! S'ok, sometimes it's good to know your limitations.

Hope your holiday season is going smoothly. Happy Sewing!

Tuesday, December 21, 2010

PTS4 Received!


Happy Winter Solstice!

Yes I know I have been absent in Dec - and I had such grand plans for you as well! Ah well sometimes things just get away from you. Just wrapping up a few last minute christmas ends around here and then I'll be ready to par-tay.

Meanwhile, check out these babies!
My fabulous swap partner from the Pillow Talk Swap round 4 was my homeboy John of QuiltDad fame his'self. How lucky am I? I had suggested some pillows for our newly renovated den might be nice and John delivered!

Are they not fabulous!! And 2, count'em TWO pillows!
John definitely went above and beyond. Don't they look lovely on the sofa? Now I really need to get my skiing posters framed and on the walls.

In their new home

And he also sent some other goodies, not all of which are captured here because my children had already absconded with them. Thank-you John!! Everything is fabulous!

Happy Sewing!


Tuesday, November 30, 2010

Stocking Advent Calendar Tutorial: Part 2


Are you ready to finish up your advent calendar? My apologies if you have been waiting patiently for part 2. The holiday weekend kind of got the better of me.

To see the first installment of this tutorial, go to Stocking Advent Calendar part 1 here
IMG_1089

Materials:
Approximately 3/4 yd of linen
3/4 yd backing fabric, batting and extra for binding
24 1" miniature wooden clothespins (find in any craft store)
Spray paint to match your design if desired (IO used Rustoleum enamel paint)
Black thread
Washable marker
20" ribbon for hanging
1/4" wooden dowel cut to 20" length
Glue gun and glue sticks

This part of the tutorial is going to be very free-spirited and short. You can finish up the back of the calendar any way you like. I have already shown you one option where the stockings were laid out in a circle.
Saavy Season's Swap goodies
That won't work for a wall hanging obviously, but works well as a table topper or centerpiece. In that case the background fabric was a square about 25x25". I sewed buttons in a circle and attached the stockings to the buttons by the loops.

Another simple option would be to stop here, find a nice velvet ribbon and simply string the stockings up on the ribbon and use it to adorn your fireplace mantle. Simple, easy and you'ld already be done! Sometimes simplicity speaks volumes! Especially around the holidays when you have a million other things to do.

Another option and the one I'm making here, is going to be hung on a wall, so I'm going to show you how I made that version.

I've chosen a linen backing mostly because I'm loving the linen these days. I've laid out all my stockings in a pattern that I liked. In this case I chose a three-tiered curve that is supposed to represent a washing line. My background pieces measures about 23" by 28"which includes 1/2" seam allowance for binding. I have chosen not to do any patchwork on the background of this piece, because I really want the stockings to be the focal point.

Once your background is cut, you'll want to layer it with batting and quilt it. I've done some basic meandering stipple quilting here, but you could just as easily do straight line quilting in random directions to keep this very modern and simple. There are lots of good online tutorials for making a quilt sandwich and for adding bindings so I'm not going to cover those parts here. Use whichever method appeals to you. Here are some examples:
Making a quilt sandwich 1 Making a quilt sandwich 2 Making a quilt sandwich 3
Binding 1 Binding 2 Binding 3

Before you sew on your binding, if you are planning on hanging this on a wall you might want to add a little sleeve onto the back of the quilt so you can hang it. I've done that here. Take 2" by 20" rectangle and finish the short edges with a narrow seam. Then fold in half lengthwise and sew it into the binding seams. Pin in place matching up the straight edges. You'll be attaching the sleeve to the quilt when you sew on the binding.
Again see the binding tutorials linked above if you need to reference that step. I've chosen a contrasting red print for the binding to liven things up a bit and because I really like the contrast of bright reds with linen. Use a long wooden dowel (mine is 1/4" diameter) to hold up your quilt and add some fishing wire or pretty ribbon to hang it on the wall later.

Next, lay out your stockings again on your finished quilt background.
I get them all situated in the way I like them, then mark about 1/2" above the stocking tops on the loop side using a water soluble marker.
Then I just drew in a line between the dots, to get a smooth curve.
This line will be the stitching line. I attached my walking foot to my sewing machine and sewed 3 lines of stitching over marker line with black thread.

I've sewed miniature clothespins onto the background at the 'washing' line and then attached the stockings to clothespins. Clothespins don't come in aqua, so I had to spray paint these first.


And you are done with the sewing!! Put and wooden dowel in the sleeve on the back of the quilt and glue a piece of decorative ribbon to the dowel at both ends. Hang on the wall and enjoy!
IMG_1090

Doesn't it look fabulous? Don't you wish you could be a kid again? You can always keep this calendar for yourself, I won't tell ;)

You could use any layout, it doesn't have to be this one. Just arrange the stockings any way you like them. It's up to you!

Now, I'm going to fill my stockings with little chocolates and other treats since tomorrow is Dec 1st!


If you make this advent calendar, please post your pics in the Trillium Design Flickr group. I always love to see your creations. Happy Holidays and Happy Sewing!


Sunday, November 21, 2010

Stocking Advent Calendar Tutorial:Part 1

It's snowing outside!! How appropriate then for me to share with you my stocking advent calendar tutorial. If you have a snow day coming your way soon, you can stitch up one of these in time for Dec 1st.

The one I'm making will look a little different but here is the one I made for the Savvy Season's swap.

Saavy Season's Swap goodies

The one we'll be making here is identical in size.
Saavy Season's Swap goodies


Ready? Set? Here we go...

You will need:
48 5" Scraps of various fabrics,
1/2 yd of lining fabrics or more scraps
rick rack or ribbon
thread
quilting template plastic
1 yd of background fabric
1 yd of backing fabric
extra fabric for binding
24 buttons

All seam allowances are 1/4"

First off, you will need to create a template using the stocking pattern shown here. Print this out so that the guideline measures 1" For me that's about 100% but it might vary for you, depending upon your printer settings etc.
Advent calendar Stocking

I traced the stocking onto a piece of plastic quilting template then cut it out. You can find this plastic at any place you buy quilting supplies. However, you can also use a piece of paperboard or cardboard, or even cut it out of a plastic lid. Whatever, works for you.

Trace the stocking pattern out 48 times. I double my fabric, press so it's flat and then trace and cut - that way I'm cutting out 2 at a time and they are exactly opposite orientation. You will need 24 with the stockings facing left and 24 facing in right. I like all my stockings facing the same direction on the final piece, so I make sure I trace them all in the same direction when fabric orientation is important.
I lined all my stockings, so I also trace 48 stockings out of a lining fabric. You can use anything for this since you won't really see the lining. I used some Kona white.


First off you will need to add numbers to the stocking fronts. I used embroidered numbers, but you can do anything here. You can use a fabric marker, or hand/machine embroider the numbers or applique them on. It's up to you!


Now we are ready to sew them together. Place the pieces together so that you have one stocking outside and one lining piece. You will be placing the lining such that right sides are facing.

Then sew a 1/4" seam along the top of the stockings.
Now iron open all the top seams as shown.

Once all your lining pieces are attached. Take two corresponding stocking sides and line them up so that the right sides are facing.
Like so...
Take a 2" piece of ribbon or rick rack and fold it in half. Align the rick-rack along the top seamline towards the back of the stocking. The ribbon is going to be inserted into the side seam of the stocking when it's sewn.

Now sew a scant 1/4" seam around the outside of the stocking. Leave a small 1" opening towards the top of the lining section as shown~
Clip the corners of the curved seams, taking care not to clip the stitching! This will help the curved seams lie flat in the final stocking.
Turn the stocking right-side out as shown~
Here I have pinned closed the remaining opening . You will then stitch this opening closed using a very narrow seam.
Pop the lining inside the stocking and voila! You have completed a mini stocking!! Now do this 23 more times....!! ;)
Ok, that's it for today. Stay tuned for the finishing part of this calendar.

Stocking Advent Calendar part 2

Sunday Sewing ~ Riverbend

Another day, another pillow. Introducing Riverbend! ~ which is similar to the Earth and Sky pillow revamped back to my original color scheme.
Riverbend

I like this one a lot - probably the colors. This one will live happily on my living room sofa. It looks quite content in it's new home. Just in time for Turkey day company.

I decided to change up the pebble quilting using a contrasting thread - looks better like that. I also increased the gathers on the curved section, also improves the look to me.
Riverbend

Stay tuned for a little mini tutorial on how to make an stocking advent calendar wall hanging for the holidays ~ coming up this week!

Happy Sewing!