PLEASE NOTE – these patterns have been removed are no longer
available
Welcome back fellow Whovians!
I know you are all anxious to find out about the 2nd block, but before I get to that I wanted to say how thrilled
Soma and I are about the enthusiasm for our little
quilt along. We now have close to 200 members and lots of active participation on the group. So a huge shout-out to all our members - and a big Thank-you! We are so thrilled you could join us!
We have gotten some feedback about the blocks now that we are 2 weeks into the QAL. I wanted to let everyone know that although the first block might've been a little tough for some, many of the blocks will be quite easy to do and suitable for beginning paper-piecers. Soma and I really wanted to challenge you guys! So bear with us. There will be easier blocks, but there will also be some challenging blocks for those of you who feel like you are up for it! With 20 blocks, I think we have something for everyone, so don't worry about having enough blocks to make a quilt even if you don't feel like you can do them all - I don't think that's going to be a problem.
Finally I wanted to throw out some general paper piecing tips which should help a bit. But for those of you who can't wait any longer,
here are the Block 2 links:
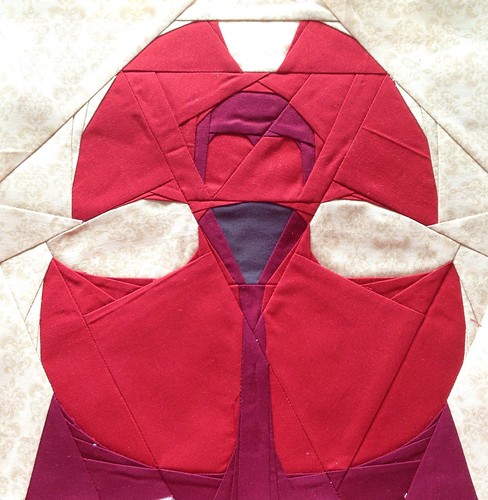
Block 2 Timelord designed by Soma Acharya
Here is my version of the block
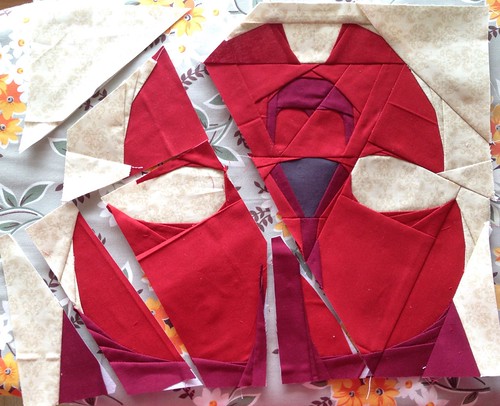
And here it is not quite assembled so you can see how it goes together:
Some handy tips for foundation-piecing:
- Foundation paper: First off I wanted to address the medium you are using to paper piece. Likely you are using printer paper to print your designs - logical of course. However, I strongly encourage you to consider a product designed specifically for foundation piecing. I cannot stress this enough. I know that it can be tough to stitch through 4++ layers of fabric and at least as many layers of paper. Here is what I use exclusively: Perfect Piecing - Transparent Quilt Block Foundation Sheets from June Taylor.
I am in no way affiliated with this company, just a happy customer. This stuff is transparent which means that you can see the fabric through it which sure helps when you are trying to place your fabric on the lines. In addition, it's much thinner than printer paper, which means you can stitch through more layers of it with ease and it's more like fabric than paper, so it's easy to punch through. In fact, this stuff is so thin I never even bother to pull it off the back when I'm done, I just leave it on there and it helps to stabilize the block a bit.
There are other products that you could also try, such as newsprint foundation paper which is thinner and therefore also easier to stitch through - it's not transparent though.
Any of these will help with your construction quite a bit.
- Fabric placement: start with a much larger piece of fabric than you think you'll need - at least until you have more experience. That way you'll be sure all your fabric covers the lines when you flip it over.
- Seam stacking: If you feel like there is just too much fabric/paper to sew through, especially on small pieces where a lot of the seam allowance overlaps, just trim the seam allowance back to 1/8". Be careful not to cut the seam line, but you can certainly trim off more than 1/4" of the excess fabric and all of the paper.
- Angled seams: Lastly, here is my handy dandy fabric placement photo tutorial for those pesky angled seams.
Here's a piece that has a nice angle on it. (This block is part of the cottage block by Kerry of verykerryberry)

See that piece between J1 and J3? There's a pretty good angle there and it can sometimes be difficult to line up those pieces once you flip them over. You don't want to end up short of fabric along the seam allowance when you trim so you end up cutting a huge wad just to avoid that. Right? However, there's a foolproof way to ensure that you have the right fit every time AND not waste fabric.
Lay the right side of the fabric down on the pattern piece so that it fits over the section you need to cover. In this case it's J3. This way you can easily cut a piece of fabric that you know will fit. Now, fold the fabric back, finger pressing along the seam line between J1 and J3. With me so far? Now hold that fabric along the fold so it doesn't come undone. With your other hand, flip over the sewn piece (the piece that has the pattern paper on it).
Hold it up to the light so you can see the seam line through the paper. That seam line is where you will line up the fold line of the fabric you are holding.
Now keep holding that fabric in place and in the light it should look like this.
Now unfold it. It should look like this:
Carefully hold the fabric in place so it doesn't shift from where you have placed it, and flip the whole thing over and sew along the seam line on your machine. When it's done it will look like this:
And when you look at the right side, it'll look like this:
When you trim it will fit perfectly over the section you were trying to cover, J3.
Voila!! Works every time! Give it a shot.
Happy Sewing!

 In this weeks installment of the Doctor Who Along, we have "4th Doctor" Tom Baker's striped scarf. Remember that scarf? To say it was long would be an understatement. It always seemed to come to the rescue when needed and somehow magically never managed to get caught on anything - or did it? It's been awhile. Tom Baker was the Doctor that started me on the series in the beginning. I was still a kid back then - hard to believe I know. The special effects in those days were laughable at best, but somehow the show had a charm that made you look beyond all the cheese.
.JPG)


