Showing posts with label trilliumdesign. Show all posts

Tuesday, August 20, 2013

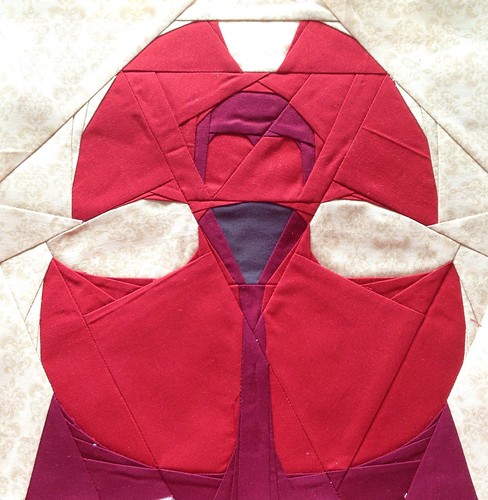
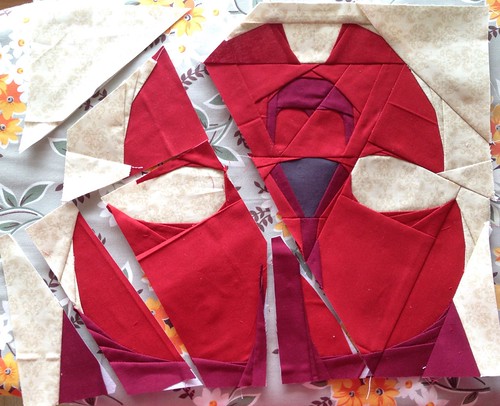
Doctor Who Along Block 8 ~ Weeping Angel

PLEASE NOTE – these patterns have been removed are no longer available
Are you ready for block 8 of the Doctor.Who.Along? It's a Weeping Angel. Whether you love 'em or hate 'em, either way they're scary. This one is at least weeping so we don't have to see the scary angel face staring at us from our quilt! Ha!


Soma designed this block and it comes in 2 formats depending upon your skill level. We realize that some of the blocks in the Doctor.Who.Along are very challenging. This one ranks among the toughest in the QAL for sure - if the angel has you scared in more than one department, try the easier block. If you are up for a challenge, go for the harder one. Either way, you'll end up with a cool new block for your quilt or project

Pattern and instructions available HERE.   Don't forget to share your finished blocks in the Flickr pool.  Doctor.Who.Along


Happy Sewing!!

Tuesday, August 6, 2013

Iconic Sonic Screwdriver Doctor.Who.Along block 7

Welcome Whovians!  With the extra days in July, we've had a bit of a longer break from the last block.  Hopefully you had a bit of a chance to get caught up and are not in withdrawal!  Are you ready for block 7?

It's pretty iconic I think ~ The Sonic Screwdriver - of course no Doctor would be caught without it!

Pattern pieces and instructions download here


As always, all the Doctor.Who.Along patterns are available through the Craftsy website as well.

Did everyone see there will be a new Doctor? I'm not sure what to think of this just yet.  It's so hard to let go of a Doctor.  Don't you think?

Happy Sewing!


Wednesday, July 10, 2013

Tinkertote Quilt-as-you-go review and Giveaway

A few weeks ago, Tara of Tinkerfrog  asked if anyone wanted to review her Quilt-as-you-go class on craftsy.  I had been wanting to take a craftsy class and learn more about QAYG, so I jumped at the opportunity.

Let me just start off by saying what a fun class this was. Tara is such a wonderful, enthusiastic teacher you can't help but want to dive right into your project after you take this class.  She really explains the quilt-as-you-go process very clearly, starting you off with an easy potholder to master the technique and moving onto the construction of a large tinker tote.

Personally, as a bag maker of many years, I can say that she really does cover all the basics of bag construction and shows you everything in detail including interior pockets, zipper installation, working with leather and how-to install purse feet and a magnetic snap.  Even if you have never made a bag, you will be able to follow Tara's instructions and end up with a fabulous quilted bag when you are done. Tara gives you lots of options for designing your bag. Don't want leather? No problem! She shows you alternate ways to make your bag.  Plus it's a scrap project and who doesn't have ton of scraps that need to be used up?

Here is the potholder that I made in no time at all.
My potholder ready for binding from @tinkerfrog #quiltasyougo  #craftsy  class. So much fun!!!

The bag I made took a little longer but that's just because it's a lot bigger and there are more steps. Turned out pretty cute I think!
Untitled

She also included a super easy peasy and fun to learn zipper tutorial - which I know can be daunting for some of you. She makes the whole process super easy and you'll wonder why you ever feared zippers after you watch her class.

It's a no-brainer peeps really!  It's also quite a lot of bang-for-your buck as you are learning quite a lot of new stuff all in one class! Totally worth-it!
Untitled

So as part of this review, Tara and Craftsy are offering a 25% discount to her quilt-as-you-go class if you use this link.


Finally, I'm giving away the bag I made on this blog!  If you want to win it, all you have to do is comment here.   If you tweet this post, share it on facebook, or pinterest, you'll get extra chances to win. Just pop back here for here post and make a comment so I know you did.


Good luck with the contest and have fun sewing!! The contest will close on July 17th. Open to US Residents only this time.

Tuesday, July 2, 2013

Who is Badwolf?

Ah yes the endless Badwolf references. We spent a whole season (or more) wondering who Badwolf was? Remember those? Pretty iconic Doctor Who I think.  That's this weeks theme for Block 5 of the Doctor.Who.Along.


Badwolf Doctor.Who.Along Block 5
Yes I know it looks complicated and to be honest, it is one of the toughest blocks in the QAL but if you go slow and do small sections at a time, I know you will get there! This block took me approximately 2 evenings to piece - that's about 6 hours.  So keep that in mind. Take your time and roll with it!

The pattern can be found here and on Craftsy.

I chose a brick print background for my block but since it's directional, it adds another layer of complexity to the piecing, if you are a beginner, stick with a non-directional or even a solid print for your background. Follow my piecing guidelines here for those tricky diagonal seams and all will be well.  A glass of wine might help also :)  After all, it's supposed to be fun, right?!

Don't forget to add your finished block photo to the Flickr Doctor.Who.Along photo pool.

Happy Sewing!  Geronimo!!!


Tuesday, June 4, 2013

Doctor.Who.Along Block 3 ~ K9

A Time lord's best friend ~ K9.

I've always been fond of K9 - all the way back to the Tom Baker days.   Maybe it's because I'm a dog lover.   So here he (or she?) is in block form.

I've added some"K9" stitching on the side to jazz him up but that is totally optional. He looks good without too!  See?


This block is probably the easiest block to piece so far. So you can breathe a sigh of relief!


The pattern can be downloaded here or through Craftsy.  In case I didn't mention it earlier, 'cuz I often forget stuff like that, Soma and I are posting all these patterns on Craftsy, so they'll be in one easy to find place.  But if you don't like to have to login to get stuff, then you can always find these patterns on our blogs for as long as they are around.

And as an added bonus, I have made an embroidery file for those with embroidery machines, that has the K9 embroidery.  If you would like a copy, please download it here.  Format is .exp but can be converted to other formats in your embroidery software depending upon your machines format.

Happy Sewing!


Friday, May 31, 2013

Oh yeah and this other stuff happened...

I swear, since I started Instagram-ing everything I completely forget to blog about it.

Sorry about that.  So these other baby quilts were made by me over the past month or so.  Completely forgot to show these off here.


Low volume Scrappytripalong
Another Low volume scrappy Trip (aka trip around the world) quilt made with inside voices bundle 3 (I think) from Amanda at Westwood acres and then a bunch of other prints that I had on hand.
I love the low volume scrappy trip combo - a lot! Low volume Scrappytripalong
Totally channeling my inner-Rita copying (Red Pepper quilts) on the binding.

Then there was this chevron quilt which follows this moda bake shop tute from Jeni (in color order) except that I did it with a jelly roll so everything is exactly half the size of the measurements in the tute.
Baby Chevrons - gifted 

Fabric is Little Red from Tasha Noel, Riley Blake fabrics
Baby Chevrons - gifted

So yeah.  Since then both of these babies have been born and quilts gifted. Yaaay!

Happy Sewing!


Thursday, May 30, 2013

Spring Quiltmarket - the wrap up

On a whim, I decided to go Spring Quiltmarket.

Spring 2013 Quilt Market in Portland

Met lots of bloggy friends, none of which I apparently took any pictures of.  Ummm???  I must've been in a daze at this point.

The whole experience was overwhelming.  The phrase "sensory overload" totally comes to mind. 

I went there with clear expectations and an agenda.  This is where you should commence your hysterical laughter. That pretty much went out the door the second I entered. Umm yeah. That place is overwhelming, an assault of the senses? Not in a bad way, but you have to rest your eyes every now and then - take a break from the constant onslaught of color and texture and all things sewing-related. So i'll just let the pictures do the talking shall I?
Spring Quiltmarket 2013
Melody Millers fabrics - huge fan of her stuff.
 New Echino offerings Echino Spring Quiltmarket 2013

Heather Bailey's amazing booth complete with larger than life embroidery wall Heather Bailey's booth Spring Quiltmarket 2013
The first day I walked into the Free Spirit section, I saw Denyse Schmidt, Amy Butler, Heather Bailey, Valori Wells, Tula Pink and Erin McMorris all in the Free Spirit section all at the same time. Whoa. Talk about design stars!

Of all that was Free Spirit, Erin McMorris' new line Astrid stole my heart. I love this fabric and can't wait to sew with it.
 Astrid by Erin McMorris

The always amazing Tula Pink's Booth Always incredible Tula Pink Spring Quiltmarket 2013 Acacia

 Did I mention that Belle is making a comeback? Belle is back! Happy Coriander Lovers unite! Amy Butler Spring Quiltmarket 2013

New Denyse Schmidt
 Denyse Schmidt Spring Quiltmarket 2013

More Beautiful booths over by Michael Miller including the lovely Mo Bedell - she was such a sweetie!
 Mo Bedell's booth Spring Quiltmarket 2013

And another Pacific Northwest gal, Violet Craft, who I didn't meet sadly, but her new fabric line Waterfront Park is one to watch out for! So gorgeous. Her booth was fab as well but I stupidly didn't take a picture of it.
 Violet Craft Waterfront Park Spring Quiltmarket 2013

And a new fabric to watch out for, Cocca by Kokka. Cocca line by Kokka Spring Quiltmarket 2013 

Some Riley Blake offerings,
Josephine Kimberling Spring Quiltmarket 2013
Josephine Kimberling - I have a fondness for Xmassy fabrics, and this one struck my fancy.

Doohikey Designs - Spring Quiltmarket 2013
Doohickey Designs cuteness. Check out those phones? And that large graphic medallion print will be fab as well.


Kona solids at Kaufman Spring Quiltmarket 2013
Graphic Kona Booth from Robert Kaufman fabrics.

And while that is by no means all of it, I think I'll end there for today. There are more market photos on my flickr feed if you just can't get enough.

Happy Sewing!

Wednesday, May 29, 2013

Tween room makeover

Many months ago my daughter requested a room re-do.  It was time to let go of her babyish room and bring it more in line with her tastes.

So she designed this room all by herself.  Her Dad and I just did all the manual labor, although she helped there as well.  Might as well learn young right?

There was a new floor install (which she picked out and helped install)


New paint


and some stenciling


New furniture that her Dad built (yup, he's handy that way) and new custom mattress courtesy of her uncle (that was fortunate).


New curtains that I sewed and some sparkly pillows made (Yes that was xmas time).
Curtains done - check!

Repurpose an old chair, repaint an old mirror, add a shag rug and you have a reading nook (aka home for the stuffies).

New headboard (made by her Dad) and upholstered (me)


and finally some wall art that she wanted, total PBteen hack job.  This sign doesn't come in black in that size - no problem... DIY to the rescue.
Sequin pillows for tween room makeover

Then finally it was all complete! (A mere 6 months later)

She is in heaven and I'm pretty happy with the whole thing myself!

Sometimes that whole DIY and sewing thing really pays off.

Happy Sewing!

ETD a word about sources:
Ribbon Damask Stencil from Royal Design Studio
DIY upholstered headboard tutes at Involving the senses  except we used a plywood board and wood frame. I also used a foam alternative called NuFoam which didn't require predrilling holes in the foam because it's more like heavyweight batting and the needle slid right through it.
Chenille Headboard Fabric and Sequin pillow fabrics from Mood. Linens and shag rug from PBTeen.  Damask Fabric for Curtains from Michael Miller.

Wednesday, May 22, 2013

200th QAL Member Celebration

The Doctor.Who.Along has officially reached the 200 member mark!
This is huge for our little quilt along.

We never imagined that we would get so much enthusiasm for our Doctor Who blocks.  So as a thank-you I am giving away a specially pulled stack of solids and textural prints perfect for the Doctor Who blocks we have planned.

Doctor.Who.Along Stack
To win this stack all you have to do is comment below.
Tweet this blogpost for an additional entry
Post it on Facebook for an additional entry
Pin it on Pinterest for an additional entry
   ~ make sure you comment back here for each additional entry.  You could get up to 4 chances to win.
Make sure you are not set to no-reply on blogger or I will have a hard time emailing you back if you win.

The Giveaway Will end on June 2nd and i'll announce on the 3rd.  International entries welcome.

Good luck!


Tuesday, May 21, 2013

Doctor.Who.Along Block 2 ~ Timelord

PLEASE NOTE – these patterns have been removed are no longer available

Welcome back fellow Whovians! I know you are all anxious to find out about the 2nd block, but before I get to that I wanted to say how thrilled Soma and I are about the enthusiasm for our little quilt along. We now have close to 200 members and lots of active participation on the group. So a huge shout-out to all our members - and a big Thank-you! We are so thrilled you could join us!

We have gotten some feedback about the blocks now that we are 2 weeks into the QAL. I wanted to let everyone know that although the first block might've been a little tough for some, many of the blocks will be quite easy to do and suitable for beginning paper-piecers. Soma and I really wanted to challenge you guys! So bear with us. There will be easier blocks, but there will also be some challenging blocks for those of you who feel like you are up for it! With 20 blocks, I think we have something for everyone, so don't worry about having enough blocks to make a quilt even if you don't feel like you can do them all - I don't think that's going to be a problem.

Finally I wanted to throw out some general paper piecing tips which should help a bit. But for those of you who can't wait any longer, here are the Block 2 links:

Block 2 Timelord designed by Soma Acharya

Here is my version of the block
Timelord Block 2 Doctor.Who.Along QAL

 And here it is not quite assembled so you can see how it goes together: Timelord Block 2 Doctor.Who.Along

Some handy tips for foundation-piecing:

  • Foundation paper: First off I wanted to address the medium you are using to paper piece. Likely you are using printer paper to print your designs - logical of course. However, I strongly encourage you to consider a product designed specifically for foundation piecing. I cannot stress this enough. I know that it can be tough to stitch through 4++ layers of fabric and at least as many layers of paper. Here is what I use exclusively: Perfect Piecing - Transparent Quilt Block Foundation Sheets from June Taylor. I am in no way affiliated with this company, just a happy customer. This stuff is transparent which means that you can see the fabric through it which sure helps when you are trying to place your fabric on the lines. In addition, it's much thinner than printer paper, which means you can stitch through more layers of it with ease and it's more like fabric than paper, so it's easy to punch through. In fact, this stuff is so thin I never even bother to pull it off the back when I'm done, I just leave it on there and it helps to stabilize the block a bit. There are other products that you could also try, such as newsprint foundation paper which is thinner and therefore also easier to stitch through - it's not transparent though. Any of these will help with your construction quite a bit. 
  • Fabric placement: start with a much larger piece of fabric than you think you'll need - at least until you have more experience. That way you'll be sure all your fabric covers the lines when you flip it over. 
  • Seam stacking:  If you feel like there is just too much fabric/paper to sew through, especially on small pieces where a lot of the seam allowance overlaps, just trim the seam allowance back to 1/8".  Be careful not to cut the seam line, but you can certainly trim off more than 1/4" of the excess fabric and all of the paper.
  • Angled seams:   Lastly, here is my handy dandy fabric placement photo tutorial for those pesky angled seams.  
Here's a piece that has a nice angle on it.  (This block is part of the cottage block by Kerry of verykerryberry)
See that piece between J1 and J3?  There's a pretty good angle there and it can sometimes be difficult to line up those pieces once you flip them over.  You don't want to end up short of fabric along the seam allowance when you trim so you end up cutting a huge wad just to avoid that. Right? However, there's a foolproof way to ensure that you have the right fit every time AND not waste fabric.  
Lay the right side of the fabric down on the pattern piece so that it fits over the section you need to cover.  In this case it's J3.  This way you can easily cut a piece of fabric that you know will fit. Now, fold the fabric back, finger pressing along the seam line between J1 and J3.  With me so far?  Now hold that fabric along the fold so it doesn't come undone.  With your other hand, flip over the sewn piece (the piece that has the pattern paper on it).  


 Hold it up to the light so you can see the seam line through the paper.  That seam line is where you will line up the fold line of the fabric you are holding.


Now keep holding that fabric in place and in the light it should look like this.


 Now unfold it.  It should look like this:


Carefully hold the fabric in place so it doesn't shift from where you have placed it, and flip the whole thing over and sew along the seam line on your machine. When it's done it will look like this:

And when you look at the right side, it'll look like this:
When you trim it will fit perfectly over the section you were trying to cover, J3.
Voila!! Works every time!  Give it a shot.

Happy Sewing!